I’m in the process of building a tricopter for long distance exploration and decided to go with the Naze32 flight controller paired with GPS and the RCTimer MAVLink OSD (which is just a hardware variant of minimOSD). I’ve got everything up and running now and it’s an awesome combo, but to do so I had to dig through a mountain of forum posts and videos to understand how to set everything up. I’m writing this post to compile some of my ah ha! moments to hopefully help you out with your setup!
Before I start, there are a couple of videos by Mochaboy RC that were incredibly useful in this process and they are How to setup a Naze32 Acro / Funfly Flight Controller and How to Setup KV OSD MinimOSD Naze32, without these I would not have been able to get anything working!
GPS Connections and Setup
I’m using an MTK GPS, but I think this is the same process for other GPS modules like the uBlox. Connecting the GPS is really easy – connect the GPS’s RX line to the Naze pin labeled 3 and the GPS’s TX line to pin 4 (bottom side of the Naze), and then power the GPS however you can (I’ve hooked mine up to an unused motor port).
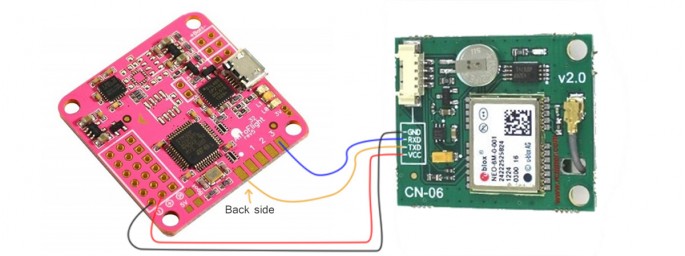
Once you’ve got it connected you’ll have to enable GPS in Baseflight Configurator. You may also have to set the GPS type and baudrate.
- Go to the CLI tab in Baseflight Configurator
- Type feature gps to enable the GPS feature
- Type set gps_type=0 (Check this table for your gps_type)
- You may also need to change gps_baudrate but check that same table and your GPS specs
- Type save and then leave the CLI tab
If you now disconnect and reconnect you should see the GPS indicator in the top right of Configurator turn green (note: USB will not power the GPS if you have it wired like I do, so you’ll have to have your flight battery powering the system!) This should be enough, now just watch the GPS tab for a position fix. This also unlocks a couple of new options on the Auxiliary Configuration page, GPS hold and GPS home!
If you don’t get a fix after being in a clear view of the sky for ten minutes or so then you can try checking the GPS output to see if it’s really communicating correctly. To do this go back to the CLI tab and type gpspassthrough, this will dump all the data coming from the GPS straight to the console window (note: You can’t turn this off once you start it, you have to remove power from the Naze to get back to normal operation.) If it’s working you should see the NMEA sentences quickly scrolling through the console. They look something like this:
- $GPGSV,3,3,11,22,42,067,42,24,14,311,43,27,05,244,00,,,,*4D
- $GPGLL,3751.65,S,14507.36,E*77
- $GPGSA,A,3,,,,,,16,18,,22,24,,,3.6,2.1,2.2*3C
If the output doesn’t look something like that then there’s a problem and you may need to configure gps_baudrate or gps_type differently. If you are getting the NMEA sentences but it’s not getting a position fix you might be able to get some insight by pasting the sentences into this NMEA parser tool I found.
OSD Connections and Setup
For this you’ll need an FTDI adapter to flash the Team KV OSD firmware onto the OSD board. I have the Arduino usb2serial adapter which seems to work well but there are many others to choose from. This section assumes you’re familiar with the Arduino IDE, which you’ll be using to flash the OSD board. Here’s how to flash the board:
- Attach the FTDI connector to the OSD and plug it into your machine
- Go to the Team KV OSD downloads page
- Download EEPROM_Clear.zip and KV_Team_2.2.zip (or newer)
- Open Arduino IDE, make sure board is set to Arduino Pro or Pro Mini (5V, 16 MHZ) w/ ATmega 328 and select the correct serial port for you FTDI adapter.
- Open EEPROM_Clear.ino and upload it (this will clear out any stray settings so you can start fresh)
- Open KV_Team_OSD.ino and upload it (shouldn’t need to change any config settings)
Now you can use the GUI application to set up your OSD board. This application is located in the KV_Team_OSD_GUI folder that came with the firmware download. You can set up various things with this app, but first you have to load the correct font onto the board. I’ll detail that first but take special note here – the font upload will not work unless you power the 12 volt side of the OSD board! So make sure you hook up 12V power to the video side of the circuit before proceeding (see wiring below). If you don’t do this the display will be all garbled and not make any sense!
Here’s how to upload the font:
- Attach the OSD to computer via FTDI
- Open the GUI application
- Click on your device’s COM port on the left side (things will turn green if this works)
- Under Font Tools on the right click Browse
- You should see MW_OSD_Team.mcm listed, open that file
- Click Upload (this will take a minute)
Okay, font’s done, so now you can check out all the other options like setting NTSC/PAL, metric/imperial units, etc. To save changes you need to click WRITE under OSD Controls in the bottom left corner.
Now you should be ready to wire your OSD up to your aircraft. The video side is pretty straight forward. On the other side just make sure to power it with 5v and connect the RX line to the pin labeled tx in the middle of the Naze board, and likewise for the TX->rx line.
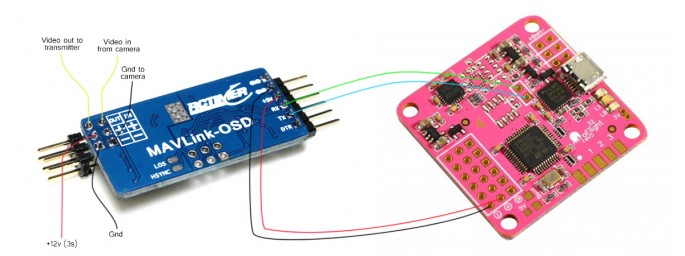
At this point you should be able to see your HUD overlaid on your video feed! You don’t have to enable anything on the Naze to enable the communication between the boards. I made the mistake of assuming the TELEMETRY feature needed to be enabled which is not the case, in fact it causes the OSD to not work right. If your overlay is working but showing disarmed even when you have armed the device then make sure that the TELEMETRY feature is not enabled (feature -telemetry in the CLI).
I hope this helps you get your OSD set up. I think this combo of Naze32, GPS, and OSD is killer! If you have any comments or suggestions about this writeup post them below or send them to tom at x-inferno dot com, I would much appreciate any feedback you have!


